

Tutorial: Replication with Postgres 9.1 on CentOS-6 / Redhat-6
17 April 2017
How to optimize PostgreSQL to ensure speed, reliability and that the reading performance is optimized.
PostgreSQL is a very powerful and stable database management system that allows managing a very large amount of data.
We at Infogrid Pacific, use PostgreSQL as the database for our very large and ever expanding digital content solutions. These can become very large very fast and it is important to ensure the system read performances are optimized, especially for very high volume and velocity applications.
Master-Slave Database Replication is good for increasing the read performance for the database tier of an application. It is used to improve the performance of a database system.
This post explains how to setup replication with PostgreSQL 9.1 on CentOS-6 / Redhat-6 in Master Slave configuration for IGP Applications and in general.
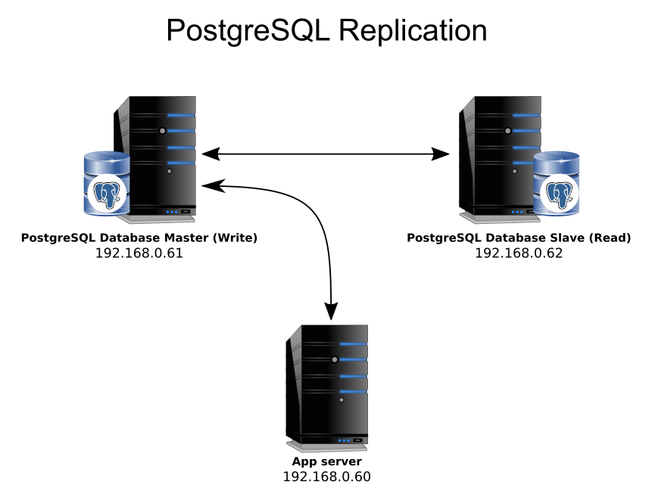
This is also often called as streaming replication which is one of the easiest methods to set up. We assume that you have at-least two PostgreSQL 9.1 servers for establishing replication between those two database servers.
One will serve as the master database server and the other will function as a slave, which will replicate.
In this tutorial we will be using the following IP addresses:
192.168.0.60 – Web Application server
192.168.0.61 – Master Database server
192.168.0.62 – Slave Database server
Step1 - Configure the Application Server (192.168.0.60)
The Application server needs to point to the Master Database server. For this, the application settings file needs to be updated accordingly with the reference to the Master server IP.
Next, we will be working on master database server and then move on to slave server configuration.
Before we start anything, do take a backup of postgres configuration file.
Login as root user on the server, and take the backups of the following files
/var/lib/pgsql/9.1/data/postgresql.conf
/var/lib/pgsql/9.1/data/pg_hba.conf
Step2 - Configure the Master Database (192.168.0.61)
We will begin by configuring the master server. All of these commands should be executed with the root user.
Edit the main postgres configuration file
vi /var/lib/pgsql/9.1/data/postgresql.conf
Find the following parameters and modify the values according to what is listed below
wal_level = hot_standby
max_wal_senders = 1
wal_keep_segments = 50
listen_addresses = '*' # what IP address(es) to listen on;
Save and close the file.
Now grant access to read this servers WAL logs (Write-Ahead Logging) from hot standby server.
Edit the pg_hba configuration file. It controls the client authentication for PostgreSQL.
vi /var/lib/pgsql/9.1/data/pg_hba.conf
Add the following line and replace the IP with your slave host name or its IP
host replication postgres 192.168.0.62/32 trust
and also add the following line to allow entry from Application server IP address
host all all 192.168.0.60/32 trust
Save and close the file.
Restart database engine to reflect the changes.
/etc/init.d/postgresql-9.1 restart
Now take snapshot of data from master and then move it to slave server.
su - postgres
psql -c "SELECT pg_start_backup('repbackup');"
tar cfP /tmp/db_backup.tar /var/lib/pgsql/9.1/data
psql -c "SELECT pg_stop_backup();"
Now move this data to Slave database server.
scp /tmp/db_backup.tar root@192.168.0.62:/tmp/
Step3 - Configure the Slave Database (192.168.0.62)
Once we have configured the master database, we can now begin to configure the slave database.
On the slave server, stop postgres if it is running.
/etc/init.d/postgresql-9.1 stop
Move the existing data directory to a new folder.
mv /var/lib/pgsql/9.1/data/ /var/lib/pgsql/9.1/data.old
Unzip master server data snapshot file that is copied onto this server.
tar xvfP /tmp/db_backup.tar
Remove postmaster.pid so standby server does not see the primary server’s pid as its own.
rm -f /var/lib/pgsql/9.1/data/postmaster.pid
Now edit the postgresql configuration file.
vi /var/lib/pgsql/9.1/data/postgresql.conf
Set the hot_standby variable value as on
hot_standby = on
Now create a recovery.conf file for this slave server to start receiving logs from master. Postgres installation comes with a sample recovery file, please copy it from appropriate location.
cp /usr/pgsql-9.1/share/recovery.conf.sample /var/lib/pgsql/9.1/data/recovery.conf
Edit this recovery.conf file
vi /var/lib/pgsql/9.1/data/recovery.conf
and update standby server settings as follows
standby_mode = on
primary_conninfo = 'host=192.168.0.61 port=5432'
Update permissions on recovery.conf file
chown postgres.postgres /var/lib/pgsql/9.1/data/recovery.conf
Now start slave database server
/etc/init.d/postgresql-9.1 start
That's It
Congratulations! Your master and slave PostgreSQL server has been configured successfully.
The slave will now connect to the master and start receiving WAL segments as they are created in the master. Any write that occurs on the master forms a WAL segment, which the slave receives and applies to its own database. With this setup, the write is done in the master and the read is done from the slave. If the slave crashes, the master fallbacks for write and read.
Promoting a slave to master in the event of a failure on the master
In the instance of a failure, a slave has to be promoted to master to take over its place.
Changes to be done on Slave Server (192.168.0.62)
On Slave server we are going to to change postgreSQL-slave Server to master server. Following are the changes
Login as root user on server console
cd /var/lib/pgsql/9.1/data
mv recovery.conf bkp-recovery.conf
vi pg_hba.conf
Add the Application server IP address for allow
host all all 192.168.0.60/32 trust
and comment the following line
#host replication postgres 192.168.0.62/32 trust
Save and close the file.
/etc/init.d/postgresql-9.1 restart
The Slave is now converted into a full read/write Master database. Now that STANDBY has turned into MASTER, point your application servers to it.
Changes to be done on Application server (192.168.0.60)
We need to replace all the existing Master Database IP, to point to the new Master Database IP in the Application server settings files.
Login as root user on server console
cd /var/opt
find -type f -name "*.py" -exec sed -i 's/192.168.0.61/192.168.0.62/g' {} \;
/etc/init.d/httpd restart
pkill screen
Restart all application related screens.
The Application server is now ready for use.